上QQ阅读APP看书,第一时间看更新
Deploying the Lambda function
We will package the application as a .jar file and upload it to the AWS web console. To do so, we use the following command:
./gradlew clean jar
Note that there are more sophisticated methods for deploying a Lambda function to the AWS environment. We will explore using tools like SAM and aws-cli later on. This section is just to familiarize the reader with the basics of the web console.
This will yield a greeter-service.jar in the build/libs directory. Depending on the choice of build tool, the location and artifact name may vary. The crux is that this is the package that can be deployed to the AWS environment.
The preceding command is for executing the Gradle build on a Unix machine. It is a different command on the Windows machine. The reader should be familiar with Gradle or follow the equivalent steps in Maven.
Next, perform the following steps:
- Select the .jar file that was built as a part of the build process. Navigate to the file and select it from the file uploader, as follows:

The following screenshot shows that the .jar was uploaded:

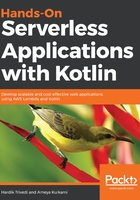
- Change the handler from example.Hello::myHandler to com.example.greeter::handleRequest, and click on Save:

The end state of the UI when the Lambda function is uploaded
At this point, we have our Lambda function written, deployed, and ready to be tested.